I’m done! I set up all four new BOINC zombies, and they’re all crunching away at seti@home workunits at this very moment! It’s been fun.
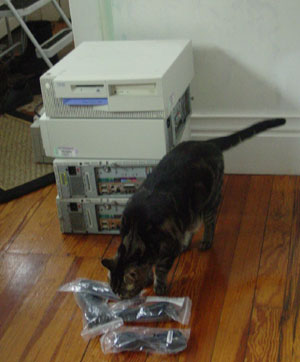
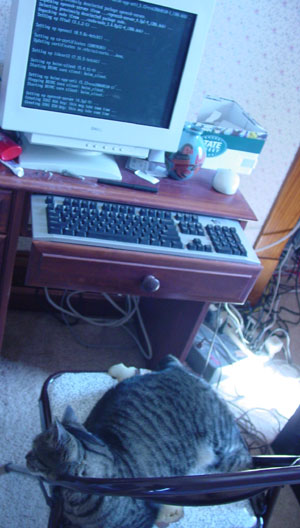
When we got the computers here, the cats gave them a rather thorough check:
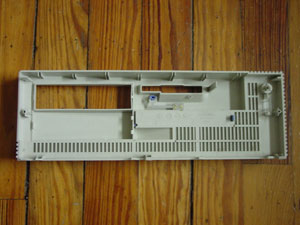
I took off the faceplates in the hope it would improve airflow. It took me a while the first time to realize how to do it. The next few times I improved greatly. There are a total of 6 tabs holding the faceplate on. In my experience, starting on the left and going towards the right is the best. First you have to click out the tab over by the CD drive, then the one to the right of the floppy/hard drive enclosure, then the one next to the power button. Then you jiggle the bottom three catches loose and pull it off. I did it by pulling down a bit, then out. I didn’t get amazingly fast at doing it, but it works.
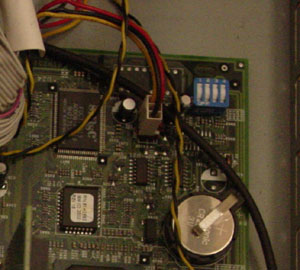
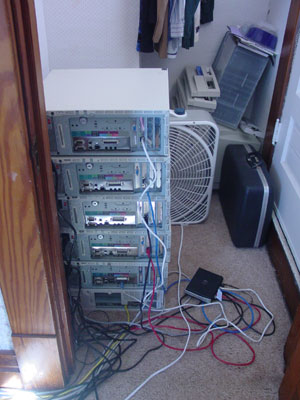
These were unaltered school machines. I was going to image the quality software that came preinstalled, but ran into a snag getting G4L to zero-out (not image) the free space, so gave up. It wasn’t worth the effort. Here you can see why:

There were some problems. The first machine I started setting up wouldn’t boot from the CD. I got it working by reading the manual, (*gasp*) and finding the jumper to reset the BIOS. I really liked the jumpers – they weren’t the little connector pins, but actual switches that were very well labeled. I was very impressed with the engineering on these things. The solution was to turn on jumper 2 on switch 1. I did this, and booted up. The settings were defaulted, then I turned it off and turned the jumper back off. It acted a bit weird when I turned it on: it disabled the keyboard “for security” for a few seconds before letting me hit F1 to get into BIOS, which is what I had been trying the whole time. I got in there, and it prompted me to tell it to autoconfigure itself, (the only option, why didn’t it just do it?) which seemed nice. I’m not sure if that was just a fancy way of saying it was loading the default settings. Once in, the BIOS was very nice. It listed the version numbers of just about everything, up to the point that it listed the MAC addresses of the network card and whatnot. Once in, it was easy to have it check the floppy first, then CD, then hard drive. Problem solved.
I also had some problems with the machines missing feet, which was a problem as I was going to stack them all up and didn’t want the stack to be unstable. I was going to cut new feet out of wood, which I may yet do, but I figured it wasn’t that big a deal and didn’t bother.
I installed Debian Etch on all the machines, and the installer was quite shiny, and the systems were very snappy once installed. These are running 728MHz “Copperfield” Pentium 3s, with anywhere from around 128 to 576MB of RAM. When I had a fresh system installed, I would log in, su, (switch to root) then apt-get update and apt-get upgrade. (nothing needed every time, presumably because it had gotten the latest from the interwebs when it installed) I then ran apt-get install sudo openssh-server boinc-app-seti. I added myself to /etc/sudoers so that I could run commands as root in my user account with sudo, then disabled root ssh login in /etc/ssh/sshd_config. (Force of habit, I guess. These aren’t open to the net.) I then figured out what worked for me to get seti@home running, thanks mostly to this guide. Here’s what I did:
$ boinc_cmd –project_attach http://setiathome.berkeley.edu/ <auth key>
$ boinc_cmd –project http://setiathome.berkeley.edu/ update
$ boinc_cmd –set_run_mode always
$ boinc_cmd –set_network_mode always
$ boinc_cmd –project http://setiathome.berkeley.edu/ resume
The auth key is emailed to you, and you can request it emailed from the seti@home site. For Rosetta @ Home, and possibly other sites that don’t email you your auth key, you may need to go through these steps:
$ boinc_cmd –lookup_account http://setiathome.berkeley.edu/ <email> <pass>
$ boinc_cmd –lookup_account_poll
I’m told this is made easier in versions after 5.8.15.
I also figured out how to set the IP to static more reliably. I think every time I’ve done it in the past, it’s been finicky and required some effort. I could get it working, but I was never really sure how I did it. Now I know. I believe every time I had tried to do it in the past, I had an active SSH session open with another machine as a guide. Having a guide is fine, but having the open session apparently made everything grumpy. Now I just run cat /etc/network/interfaces in SSH and log off, keeping the screen up. I then use the other machine’s config as a guide, making changes as needed, then run sudo /etc/init.d/networking restart . This works. The problem had always been having an open SSH connection. Hooray learning! Here’s an example:
#you might need
allow-hotplug eth0
#then
auto eth0
iface eth0 inet static
address 192.168.1.200
netmask 255.255.255.0
network 192.168.1.0
broadcast 192.168.1.255
gateway 192.168.1.1
I then realized that I wanted the clock to be sane. I installed ntpdate, ran it once pointed at ntp1.sbcglobal.net, then uninstalled it. I then used /sbin/hwclock –systohc –utc to set the hardware clock to that time. (As found here.)
When I was almost done, my cat saw fit to steal my chair:
At which point I decided to take a break. The result?
epic and a nice setup! The tower of doom looks suitably sweet. Also the adding of pictures makes the post look cooler, just for future reference. Now just 2 questions, wont those use a bunch of power and what is the purpose of having boinc zombies? Also i got my computers back to being operational. The new ZA update didn’t want to work right so it just made the main program be stupid which took away all internet access. Strangely though, even with the monitor off (no browser would work) and after pressing the big red stop button that shuts down net traffic, xfire still worked… who knew? But the other machine got its windows side fully patched and brought up to date. Which was browsers, 12 essential windows updates, java, flash, shockwave, ZA, and a few other things. So yea… its been kinda epic.
Yes, I imagine they are using quite a bit of power, seeing as BOINC is designed to use all otherwise unused CPU cycles, meaning the CPU should always be at 100% use. If I remember right the power supply of each machine was rated at around 200W or so. I’m using my BOINC zombies for the Seti@Home project, which crunches radio data for signs of extraterrestrial life. I’m glad you got your stuff back up and running. Yeah, xfire does have a strange ability to connect through the worst of circumstances. I think once I was at the point where for some reason I couldn’t browse, but xfire still worked. That thing is tough.